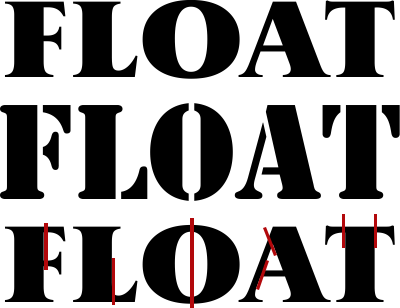
 I received an e-mail a few days ago from someone who needed to take some custom text and convert it into something functionally like the Stencil font. You’ll see three pieces of text at right. Let’s just concentrate on the top two for now.
The first is simply the word “FLOAT” typed out in a serif font. You’ll note that two of the letters have holes in them, the “O” and the “A.” The second line of text was typed with the Stencil font and you can see gaps designed into each of the letters.
Depending on the task at hand, you may need the letters cut as in the Stencil font or you may need pieces of a letter “bridged” together. No matter the variation you need, the answer is quite simple and can be done with a series of rectangles. Now let’s look at the third piece of text and you’ll see I’ve drawn some red rectangles on top of the original text. If we want something similar to the way the Stencil font works, use the Trim command in CorelDRAW to trim the rectangles from the text. Should you need to connect two pieces, draw a rectangle to act as the bridge and use the Weld command in CorelDRAW to put it together with the text.
This is just one of many examples where you can use Weld and Trim in your CorelDRAW workflow. I believe them to be two of the most important features in the program and features that every user must know well. I cover them with numerous example in CorelDRAW X6 Unleashed (and CorelDRAW X5 Unleashed, CorelDRAW X4 Unleashed, etc.) and every user should have this important resource in their training arsenal.


0 Comments