The whole basis of vector graphics, such as those created in CorelDRAW, is based on a little thing called a node. Maybe you know the node well, or maybe you have no idea what I’m talking about. In general, having too many nodes is a bad thing. In this post I will tell you about the node and what you can do to keep the number of them under control. When we’re done, feel free to crown yourself as the King or Queen of Nodes.
What is a Node?
A node is simply a point in space. To have a line, you need a minimum of two nodes. While you don’t need to be an expert in math, there is a mathematical equation that describes the line between any two nodes. Because the line is defined by math, we can scale the shape drawn to any size without any loss of quality. All of this combines together to form the backbone of vector graphics.
In CorelDRAW, most of the work you do with nodes is done with the Shape tool. Of course you can also draw from point to point (nodes) using the Bézier tool. In fact, vector graphics all goes back to a Frenchman named Pierre Bézier. Notice how the tool is named after him? One of the cool features in CorelDRAW X5 and X6 is that you can have larger sized nodes on screen and they can be color-coded based on the type of node. I have written a detailed blog post on getting the larger nodes and color-coding them.
Problems With Excess Nodes
The more nodes you have in a file, the larger the file. While that is an issue to understand, it is the least troublesome problem. Having too many nodes can made a graphic look rougher, can cause a file to take much longer to engrave or cut and in extreme instances can cause instability.
Think of a circle. It is a very simply shape with nice smooth curves. To properly represent a circle in CorelDRAW, you need only four nodes spaced 90 degrees apart. Of course that sample circle could be created using hundreds or even thousands of nodes. To the naked eye, the two circles could look identical. Or the line segments of the circle with many nodes could be straight lines instead of curves. Again, it might look the same, but even more complexity is introduced. In Figure 1, I show examples of each of these scenarios. On the top row you’ll see each one with nodes visible while the bottom row shows the actual vector curve.
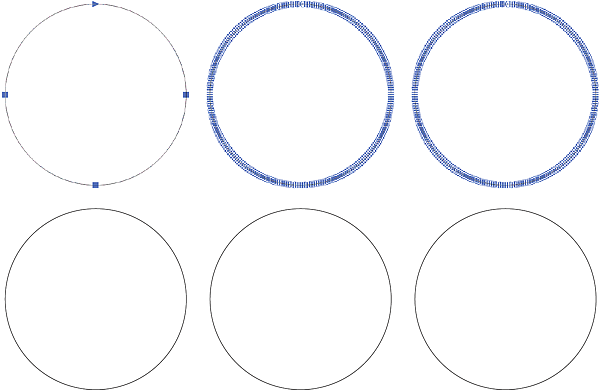
Figure 1: A circle with four nodes at left, 256 nodes in the middle and 256 nodes with line segments on the right.
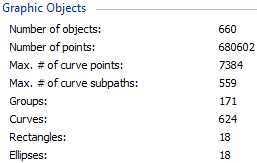 While Figure 1 shows objects with a lot of nodes, it is still a somewhat hidden problem. That’s why excess nodes can be so scary. You may not know there is a problem until it comes time for output. One quick way to look for problems is to select File | Document Properties in CorelDRAW. At right is the Graphic Objects section for a file loaded with node and other problems.
The item showing the “Number of points” is the number of nodes included. And the “Max # of curve points” is how many nodes are on a single object in the file. There may indeed be a reason for an object to have thousands of nodes, but not on the simplistic shapes found in this file.
Autotracing Can Bring Excess Nodes
One way to end up with too many nodes is to use an automated tool to trace a bitmap and convert it to vector. Most of these tools include settings for smoothing the curves which should lead to fewer nodes. Corel PowerTRACE is one such tool and it does have settings for minimizing the number of nodes during a trace. Of course, smoothing the curves to reduce nodes can also lead to the curves changing their shape. If possible, try to manually trace bitmaps using the Bézier tool. Not only will you get a more reasonable number of nodes, it often takes less time than cleaning up the mess of nodes from autotracing.
You may find some clip art collections have extra nodes because autotracing was involved and the creators didn’t properly clean up the nodes after tracing. Unfortunately it may not be possible to know this until after purchasing. I try to make sure all of the artwork collections we sell at Graphics Unleashed are optimized for node counts.
WMF and DXF Files Are Littered With Nodes
If you import files in WMF or DXF format, they will be loaded with nodes. In the case of WMF format, curves are not supported in the file format. Therefore every shape that appears to have curves is created using hundreds or even thousands of short straight lines. That means lots of nodes between each of those line segments. You’ll definitely want to avoid clip art collections supplied in WMF format for this reason.
Directly importing a DXF file can also face huge numbers of objects and nodes from shapes that appear much simpler. Rather than directly importing a DXF file, you may want to have the CAD user who created the file save it in PDF format. There are also ways to convert the DXF file using Corel DESIGNER or CorelCAD that should get you far better results. Unfortunately both of those solutions require buying expensive software.
This is equally true if you export to either of these formats. For those who need a DXF file to drive some sort of cutter or router, you may want to explore DXFTool as it exports “clean” DXF files from CorelDRAW. Yes, it has a cost, but is worth it for those of you who need good DXF files.
Cleaning Up Nodes
There are three ways to clean up nodes. The most effective method is also the most time consuming. In that case you need to select the nodes to delete manually and press the Delete key. On a couple of simple shapes, it isn’t that big of a deal. Yet an object with hundreds or thousands of nodes could take a while. Another option is to select all nodes of the object you want optimized with the Shape tool and then look to the Property Bar (see below right).
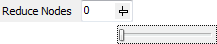 Clicking on the words Reduce Nodes will automatically reduce nodes based on the standard deviation distance of the nodes from the path. That sounds much more complicated that it is in practice. Just click it. If it works, great. If not, press Ctrl + Z to Undo. Alternatively click on the Curve Smoothness slider (on the right of the graphic) and you can adjust anywhere from 0-100. The higher the number, the more nodes will be removed. But a higher number also means the curve may be more distorted. You will see the curve and number of nodes update dynamically so slide it until you are happy with the results.
In Closing
Keeping track of the number of nodes on objects as you are creating them will keep them under control. The problems arise when artwork comes from elsewhere and brings thousands of nodes with it. While it may take you a long time to clean up the artwork, it will save you headaches in the long run. Now you know the source of some of these problematic files and ways to solve the problems.


On the other hand, .WMF files are the only vector art that gets handled seamlessly by Microsoft Office apps such as Word and PowerPoint. A WMF for MS Office use can’t contain gradients or bitmaps, but otherwise that format is ideal for bringing objects such as logos extracted from PDFs or simple line art into your workplace publications/presentations.
Anonymous, WMF is not the only vector format handled seamlessly by Microsoft Office. The EMF format was created BY MICROSOFT as a successor to WMF and is far superior in many ways, including nodes.
Thanks. Subsequently went to MS and read guidelines for selecting appropriate picture formats – http://support.microsoft.com/kb/320314. A good read. Succinct descriptions.